Step-by-Step Guide to Strip and Wax VCT Floors Effectively
Revitalize your space with our step-by-step guide to strip and wax VCT floors effectively. Achieve a sparkling finish and extend your floor's life effortlessly!
Understanding VCT Flooring
Vinyl Composition Tile (VCT) flooring is a popular choice for both commercial and residential spaces due to its durability, affordability, and ease of maintenance. Composed primarily of limestone, thermoplastic binder, and color pigments, VCT tiles are known for their resilience and ability to withstand heavy foot traffic. These tiles are often favored in high-traffic areas like schools, hospitals, and retail stores due to their robustness.
VCT flooring is available in a variety of colors and patterns, making it a versatile option for different interior designs. Despite its durability, VCT flooring requires regular maintenance to retain its appearance and extend its lifespan. Over time, dirt, grime, and scuffs can accumulate on the surface, diminishing the floor's aesthetic appeal. Therefore, understanding how to properly strip and wax VCT floors is essential for maintaining their glossy finish and keeping them in top condition.
The composition of VCT flooring makes it relatively easy to clean and maintain, but it also requires periodic stripping and waxing to preserve its shine and protect the surface. Stripping removes the old, dull layers of wax and any embedded dirt, while waxing provides a fresh, protective layer that enhances the floor's appearance and durability. By following a systematic approach to stripping and waxing, you can ensure that your VCT floors remain pristine and continue to enhance the overall look of your space.
Importance of Regular Maintenance for VCT Floors
Regular maintenance of VCT floors is crucial for several reasons. First and foremost, it helps to maintain the floor's appearance. A well-maintained VCT floor can significantly enhance the overall aesthetic of any space, making it look clean, polished, and inviting. On the other hand, neglected VCT floors can quickly become dull, dirty, and unattractive, detracting from the overall appeal of the area.
Moreover, regular maintenance can extend the life of your VCT floors. By routinely stripping and waxing the floor, you can protect it from wear and tear, scratches, and other damage caused by heavy foot traffic and everyday use. The wax layer acts as a barrier, preventing dirt and debris from penetrating the surface of the tiles and causing permanent damage. This not only keeps the floor looking great but also reduces the need for costly repairs or replacements.
In addition to aesthetic and durability benefits, regular maintenance of VCT floors also promotes a healthier environment. Floors that are properly cleaned and maintained are less likely to harbor bacteria, mold, and other harmful microorganisms. This is especially important in settings such as hospitals, schools, and commercial kitchens, where cleanliness and hygiene are paramount. By keeping your VCT floors in good condition, you can ensure a safer and healthier environment for everyone who uses the space.
Tools and Supplies Needed for Stripping and Waxing
Before embarking on the task of stripping and waxing VCT floors, it is essential to gather all the necessary tools and supplies. Having everything you need on hand will make the process more efficient and ensure that you achieve the best possible results. Here is a comprehensive list of the tools and supplies you will need:
- Stripping Solution: A commercial-grade floor stripper designed to break down and remove old wax and embedded dirt from the surface of the VCT tiles.
- Waxing Solution: A high-quality floor finish or wax that provides a protective, glossy layer to the VCT floor.
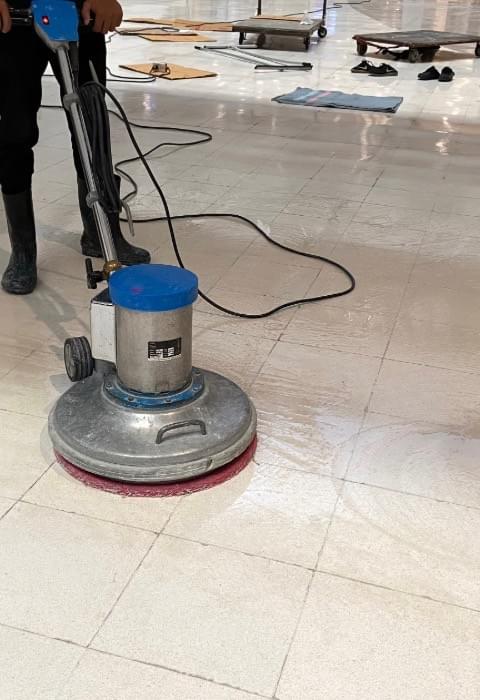
- Floor Machine: Also known as a buffer or polisher, this machine is equipped with different pads for stripping and polishing the floor.
- Stripping Pads: Heavy-duty pads that attach to the floor machine for effective stripping of old wax and grime.
- Polishing Pads: Softer pads used with the floor machine to buff and polish the floor after waxing.
- Mop and Bucket: For applying the stripping and waxing solutions, as well as for cleaning the floor during the process.
- Wet/Dry Vacuum: To remove the stripping solution and loosened wax from the floor.
- Scraper: For manually removing stubborn wax buildup in corners and along edges.
- Protective Gear: Gloves, goggles, and appropriate footwear to protect yourself from the chemicals used in the stripping and waxing process.
- Warning Signs: To alert others that the floor is being worked on and to prevent accidents.
By ensuring that you have all these tools and supplies ready before you start, you can streamline the stripping and waxing process and achieve professional-quality results.
Preparing the Area for Stripping and Waxing
Preparation is a key step in the stripping and waxing process. Before you begin, it is important to clear the area of any furniture, rugs, and other items that could obstruct your work. This will allow you to move freely and ensure that every part of the floor is properly treated. If possible, move large items to another room or outside the space you are working on.
Once the area is cleared, you should thoroughly sweep or vacuum the floor to remove loose dirt, dust, and debris. This will prevent these particles from becoming embedded in the floor during the stripping and waxing process. After sweeping, damp mop the floor with a neutral cleaner to remove any remaining residue. Ensure the floor is completely dry before proceeding to the next step.
It is also essential to protect surrounding areas and surfaces from spills and splashes during the stripping and waxing process. Use painter's tape and plastic sheeting to cover baseboards, walls, and other fixtures that could be affected by the chemicals. Additionally, place warning signs around the work area to alert others to the presence of wet floors and potential hazards. Taking these preparatory steps will help you achieve a cleaner, more professional result and minimize the risk of accidents or damage.
Step-by-Step Process for Stripping VCT Floors
Stripping VCT floors is a meticulous process that requires attention to detail and careful execution. Follow these steps to effectively strip your VCT floors and prepare them for waxing:
- Mix the Stripping Solution: Begin by mixing the stripping solution according to the manufacturer's instructions. Use a mop and bucket to apply the solution evenly across the floor, starting from the farthest corner and working your way towards the exit. Ensure that the floor is thoroughly saturated with the solution.
- Allow the Solution to Dwell: Let the stripping solution sit on the floor for the recommended amount of time, typically 5-10 minutes. This allows the solution to break down the old wax and loosen dirt and grime. Be careful not to let the solution dry on the floor.
- Scrub the Floor: Use the floor machine equipped with stripping pads to scrub the floor. Work in small sections, moving the machine back and forth in a systematic pattern to ensure even coverage. Pay special attention to edges and corners, using a scraper to remove any stubborn wax buildup.
- Remove the Stripping Solution: Once the entire floor has been scrubbed, use a wet/dry vacuum to remove the stripping solution and loosened wax. Make sure to vacuum up all the liquid to prevent it from drying and leaving residue on the floor.
- Rinse the Floor: After vacuuming, rinse the floor with clean water to remove any remaining stripping solution. Use a mop and bucket for this step, and change the water frequently to ensure a thorough rinse. Repeat the rinsing process if necessary to ensure the floor is completely clean.
- Dry the Floor: Allow the floor to air dry completely before proceeding to the waxing step. You can use fans or open windows to speed up the drying process. Ensure there is no moisture left on the floor, as this can affect the adhesion of the wax.
By following these steps, you can effectively strip your VCT floors and prepare them for the waxing process, ensuring a clean and smooth surface for optimal results.
How to Properly Wax VCT Floors
Waxing is the next crucial step in maintaining VCT floors. Proper application of wax not only enhances the floor's appearance but also provides a protective layer that extends its lifespan. Follow these steps to wax your VCT floors effectively:
- Choose the Right Wax: Select a high-quality floor wax that is specifically designed for VCT flooring. Read the manufacturer's instructions to ensure proper application and drying times.
- Apply the First Coat: Using a clean mop and bucket, apply a thin, even coat of wax to the floor. Start from the farthest corner of the room and work your way towards the exit to avoid stepping on the freshly waxed surface. Use smooth, overlapping strokes to ensure even coverage and avoid puddling.
- Allow the Wax to Dry: Let the first coat of wax dry completely before applying additional coats. Drying times can vary depending on the product, but it typically takes 30-60 minutes. Ensure the area is well-ventilated to speed up the drying process.
- Apply Additional Coats: For optimal protection and shine, apply 3-5 coats of wax. Each coat should be applied in the same manner as the first, with each layer allowed to dry completely before the next is applied. Be patient and avoid rushing the process, as this can result in an uneven finish.
- Buff the Floor: Once all coats of wax are dry, use the floor machine with polishing pads to buff the floor. This step enhances the shine and smoothness of the waxed surface. Work in small sections, moving the machine in a systematic pattern to achieve an even, high-gloss finish.
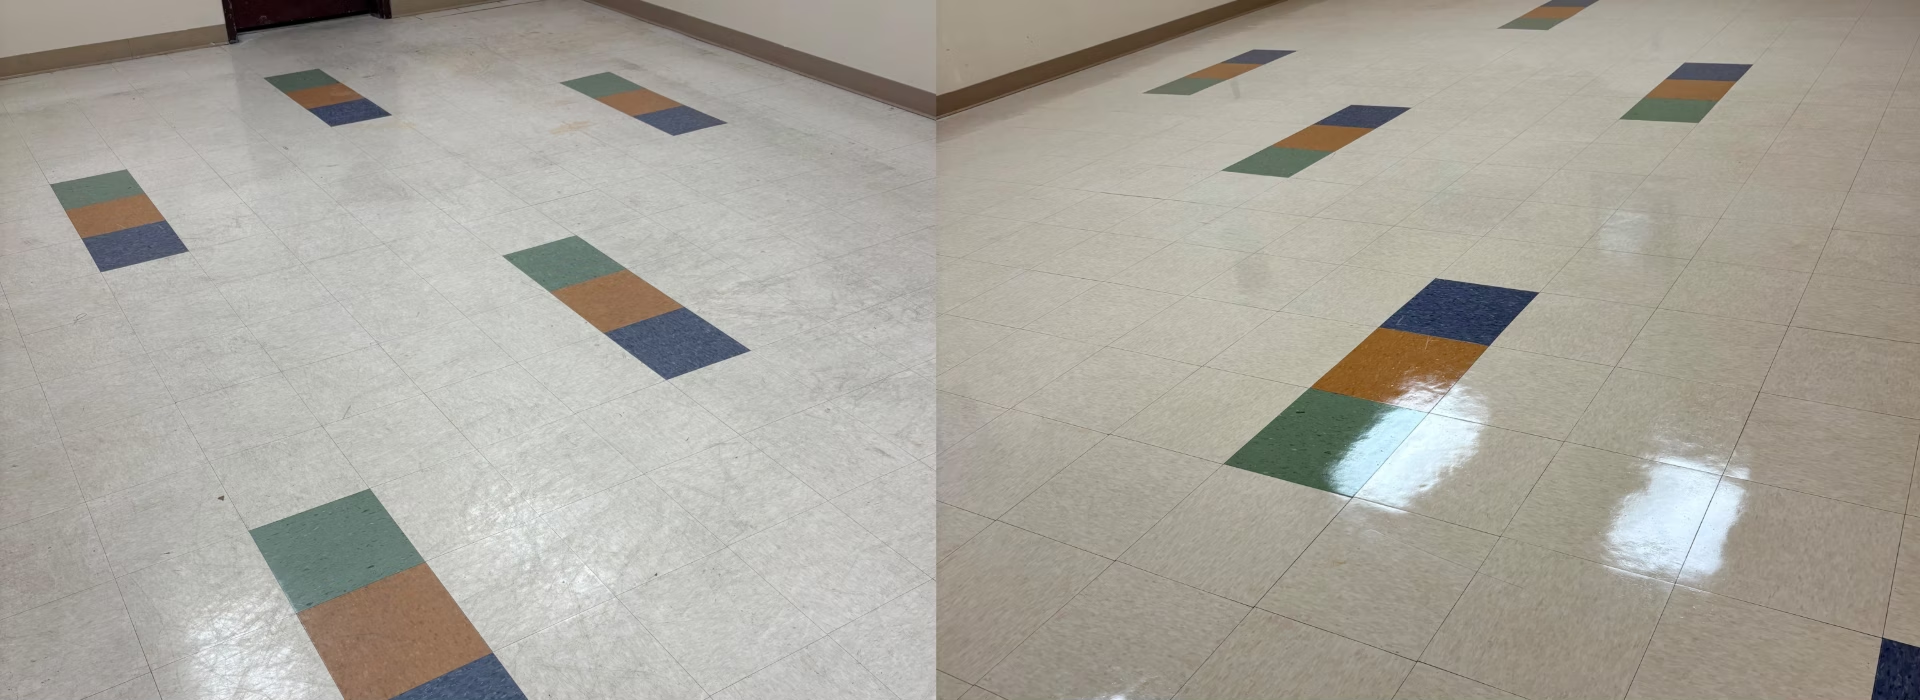
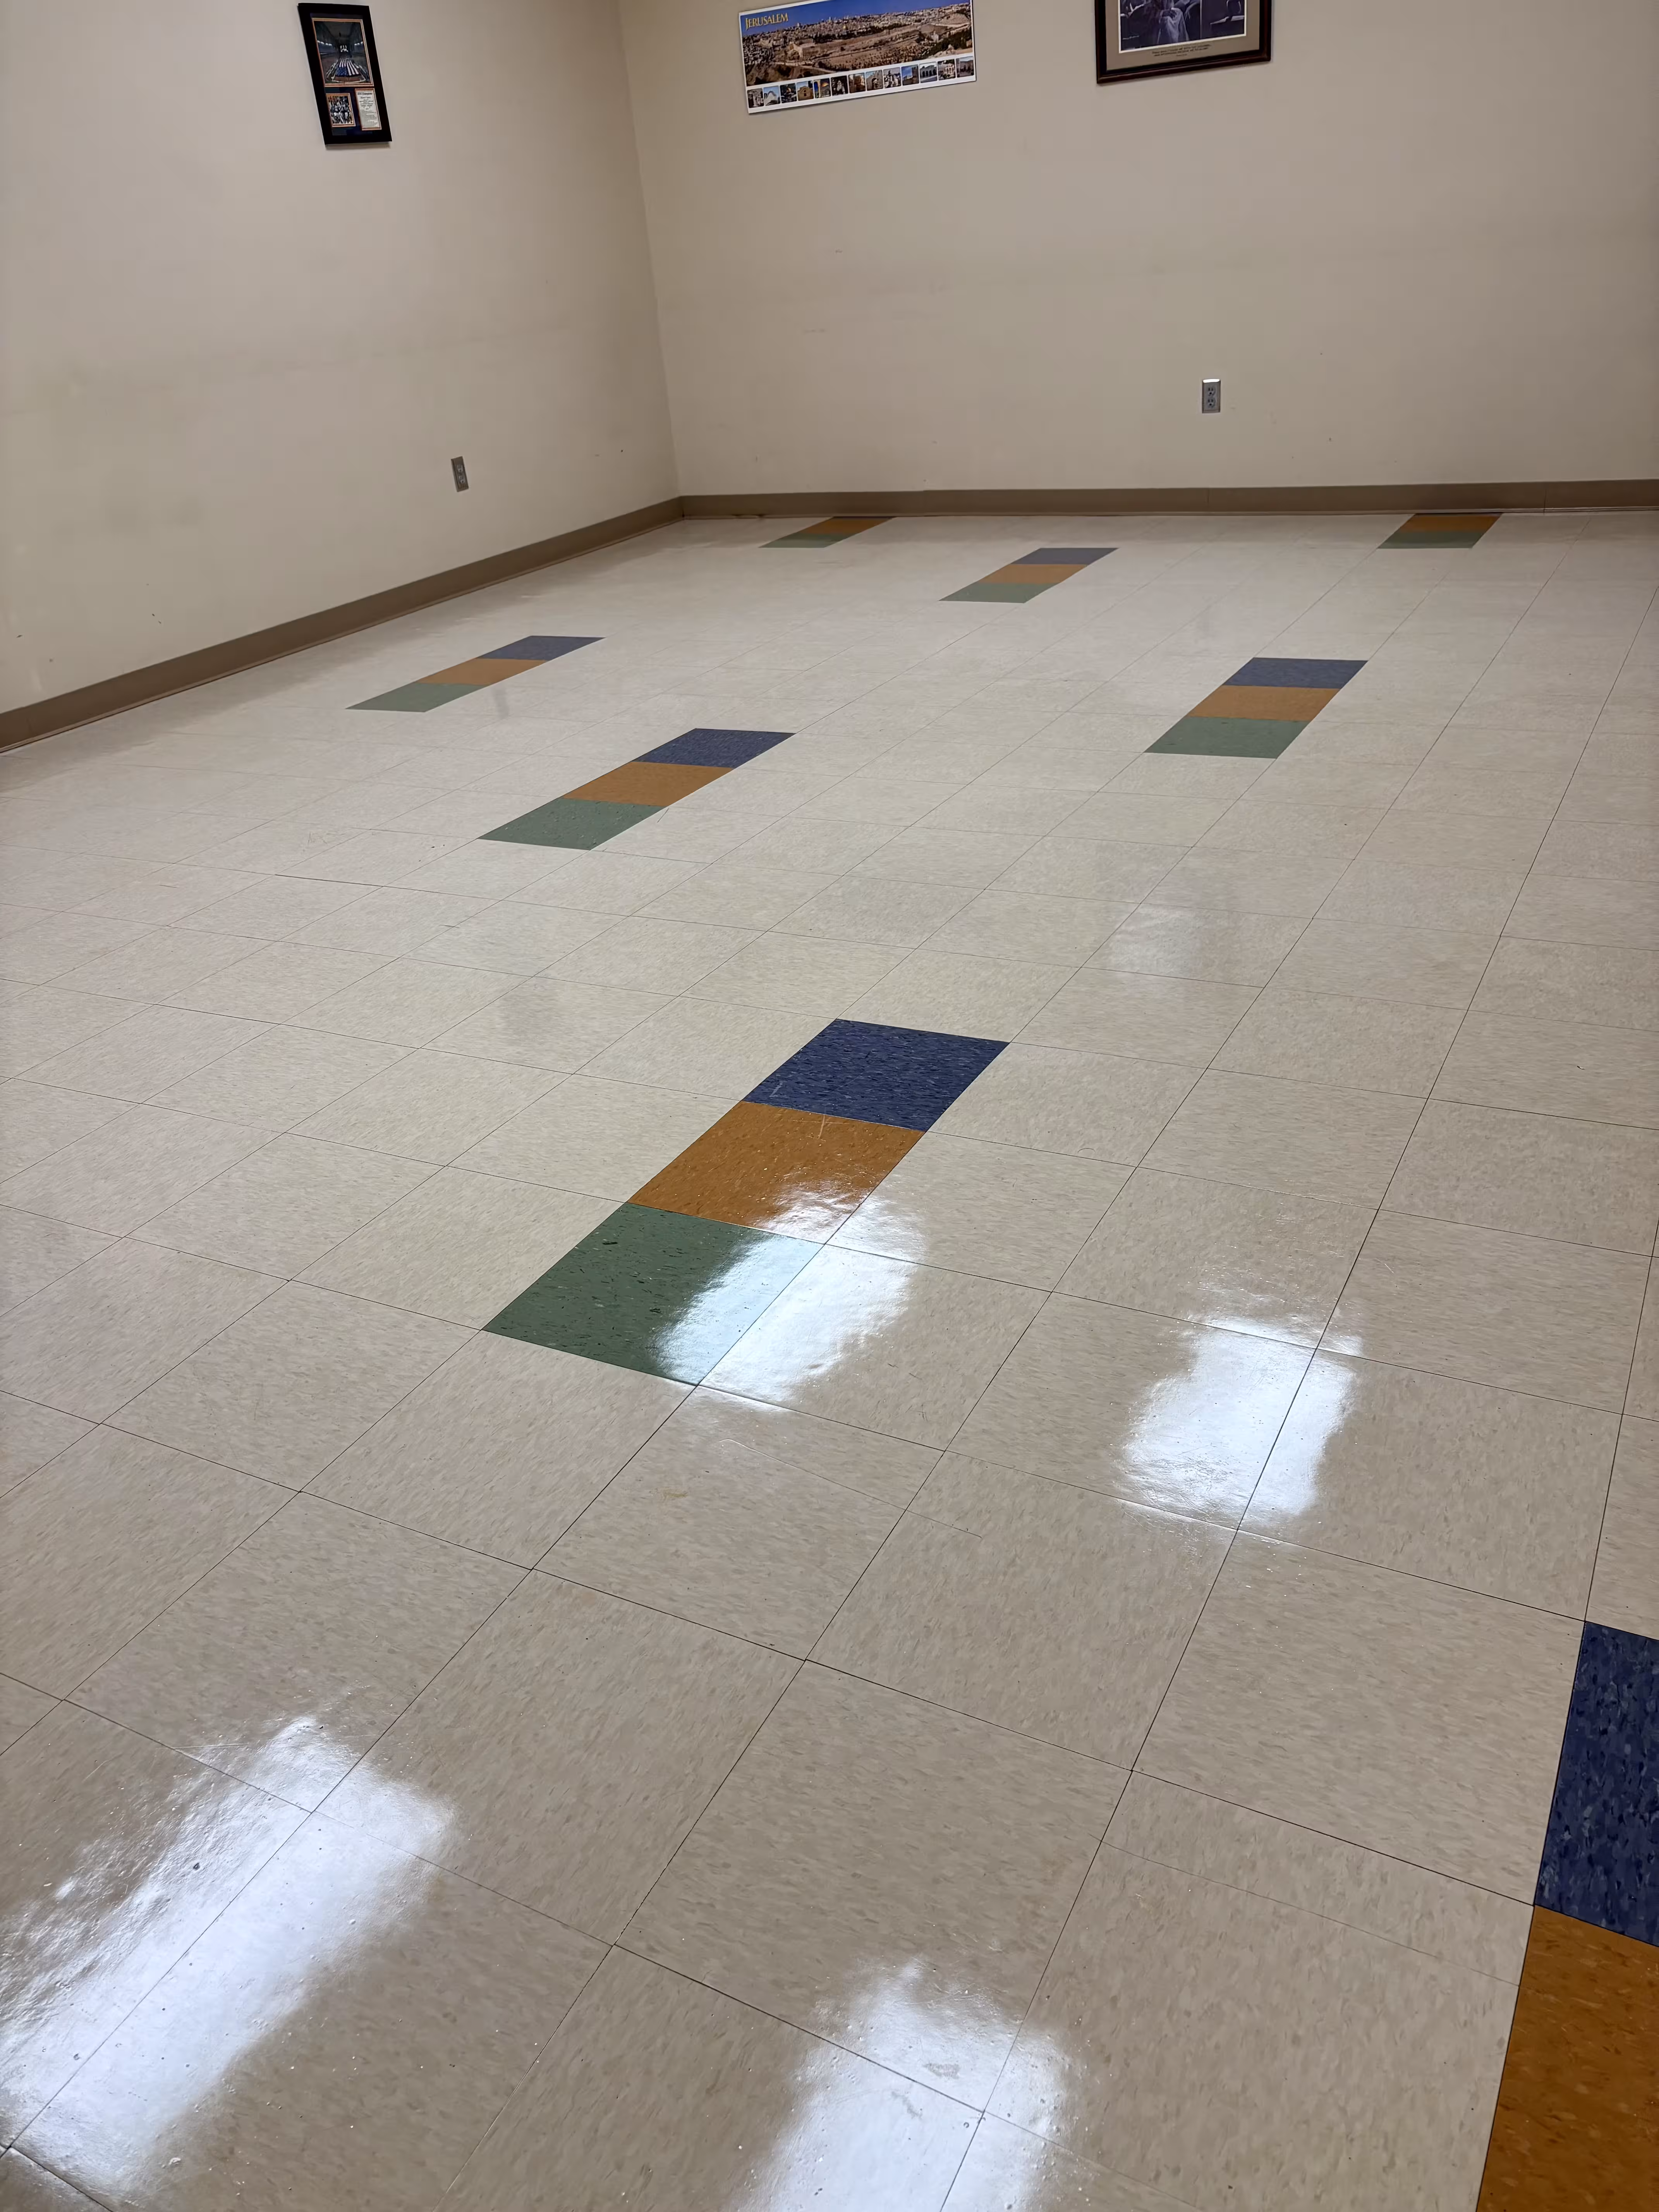
By following these steps, you can ensure that your VCT floors are properly waxed and protected, resulting in a beautiful, long-lasting finish.
Tips for Achieving a High-Gloss Finish
Achieving a high-gloss finish on VCT floors requires attention to detail and proper technique. Here are some tips to help you achieve a professional, mirror-like shine:
- Use High-Quality Products: Invest in high-quality stripping and waxing products designed for VCT floors. Cheap or inferior products may not provide the desired results and can even damage the floor.
- Apply Thin Coats: When waxing, apply thin, even coats rather than thick layers. Thick coats can take longer to dry and may result in an uneven finish. Multiple thin coats provide better coverage and a smoother, more uniform appearance.
- Buff Between Coats: For an extra glossy finish, consider lightly buffing the floor between coats of wax. This helps to smooth out any imperfections and enhances the overall shine. Use a soft polishing pad and be gentle to avoid damaging the wax layers.
- Maintain a Clean Environment: Dust and debris can easily become embedded in the wax, ruining the finish. Keep the work area as clean as possible during the waxing process. Use a damp mop to remove any dust or particles before applying each coat of wax.
- Allow Proper Drying Time: Be patient and allow each coat of wax to dry completely before applying the next. Rushing the process can lead to a cloudy or streaky finish. Follow the manufacturer's recommended drying times and ensure the area is well-ventilated.
By following these tips, you can achieve a stunning high-gloss finish that enhances the appearance of your VCT floors and adds a touch of elegance to your space.
Common Mistakes to Avoid When Stripping and Waxing
Stripping and waxing VCT floors is a detailed process that requires precision and care. Avoiding common mistakes can help you achieve the best possible results and prevent damage to your floors. Here are some common mistakes to watch out for:
- Using the Wrong Products: Not all floor strippers and waxes are suitable for VCT flooring. Using the wrong products can damage the tiles and result in a poor finish. Always use products specifically designed for VCT floors and follow the manufacturer's instructions.
- Skipping the Preparation Step: Failing to properly prepare the area and clean the floor before stripping and waxing can lead to subpar results. Dirt and debris can become embedded in the wax, causing an uneven and unattractive finish. Take the time to thoroughly clean and prepare the floor before starting the process.
- Applying Too Much or Too Little Stripping Solution: Applying too much stripping solution can make it difficult to remove and may leave a residue on the floor. On the other hand, using too little solution may not effectively break down the old wax. Follow the manufacturer's guidelines for the correct amount of stripping solution to use.
- Not Allowing Adequate Drying Time: Rushing the drying process between coats of wax can result in a cloudy or streaky finish. Be patient and allow each coat to dry completely before applying the next. Proper ventilation can help speed up the drying process.
- Neglecting Regular Maintenance: Stripping and waxing are not one-time tasks. Regular maintenance is essential to keep VCT floors looking their best. Neglecting routine cleaning and re-waxing can lead to a buildup of dirt and a dull appearance. Develop a regular maintenance schedule to keep your floors in top condition.
By avoiding these common mistakes, you can achieve a professional-quality finish and ensure the longevity and beauty of your VCT floors.
Maintenance Tips for Long-Lasting VCT Floors
Maintaining VCT floors is an ongoing process that requires regular care and attention. By following these maintenance tips, you can keep your VCT floors looking their best and extend their lifespan:
- Regular Cleaning: Sweep or vacuum the floor daily to remove loose dirt and debris. Damp mop the floor with a neutral cleaner at least once a week to remove any remaining residue. Avoid using harsh chemicals or abrasive cleaners that can damage the wax and tiles.
- Spot Cleaning: Address spills and stains promptly to prevent them from setting and causing permanent damage. Use a damp cloth or mop to clean up spills, and follow up with a neutral cleaner if necessary.
- Re-Waxing: Depending on the level of foot traffic and wear, VCT floors may need to be re-waxed every 3-6 months. Apply a fresh coat of wax to maintain the protective layer and keep the floor looking glossy and new.
- Matting and Rugs: Place mats and rugs at entrances and high-traffic areas to reduce the amount of dirt and debris tracked onto the floor. This helps to protect the wax layer and reduces the frequency of stripping and waxing.
- Furniture Pads: Use furniture pads or glides under the legs of chairs, tables, and other heavy items to prevent scratches and scuffs on the floor. Avoid dragging furniture across the floor, as this can damage the wax and tiles.
- Regular Inspections: Periodically inspect the floor for signs of wear, damage, or dullness. Address any issues promptly to prevent further damage and maintain the floor's appearance.
By incorporating these maintenance tips into your routine, you can ensure that your VCT floors remain in excellent condition and continue to enhance the beauty of your space.
Conclusion and Final Thoughts
Stripping and waxing VCT floors may seem like a daunting task, but with the right tools, supplies, and techniques, it can be a straightforward and rewarding process. By following our step-by-step guide, you can achieve a sparkling, high-gloss finish that revitalizes your space and extends the life of your floors.
Regular maintenance is key to preserving the beauty and durability of VCT flooring. By implementing a consistent cleaning and re-waxing schedule, you can keep your floors looking their best and avoid the need for costly repairs or replacements. Remember, the effort you put into maintaining your VCT floors will pay off in the form of a clean, polished, and inviting environment.
Whether you are a homeowner looking to refresh your living space or a business owner aiming to create a professional and welcoming atmosphere, properly stripping and waxing your VCT floors is an essential part of floor care. With our comprehensive guide, you can confidently tackle this task and enjoy the benefits of beautiful, long-lasting VCT flooring.